Friday, December 20, 2013

Gingerbread Cookies

HELLO!

I'm pretty excited right now because Christmas is coming! When I was really little, my mama convinced me that robbers would come down the chimney and steal my Christmas gifts if I didn't sleep next to the tree to guard them. At that age, I already doubted the existence of Santa. Those robbers? Yeah, I thought they were a legitimate threat. This "Santa" business was probably a cover story for these highly trained, ninja-present-robbers.

Looking back, this might have been a vaguely malicious thing to tell a four-year-old girl... and yes, I did sleep in front of the tree every Christmas Eve. And I still do. I'm twenty now, you do the math. Was this an awkward story? Probably, huh. Well, you wanna know something ELSE that's awkward?

Attractive guys! Attractive guys are not inherently awkward, but I never know what to say to them. One of my friends told me that I shouldn't be awkward because I'm attractive as well. However, I think the real problem is that I have the subtlety of a brick wall.

Me: "I wish it was socially acceptable to just say, 'Hi! You're really cute and I'M really cute, so we should just be cute together and get coffee!'"
Friend: "Uh... that might work. I mean, maybe if he was really desperate he'd be willing to overlook that awkwardness. I think you're supposed to show that you're interested in his PERSONALITY, not his looks."
Me: "So... 'Hi! You're really cute, and I'm really cute, but I like people based on MORE than their appearance, so we should find out if we have compatible personalities and get coffee!"'
Friend: "No. Just... no. No."

Clearly, I'm a lost cause in the romantic realm. That would be pretty depressing if it weren't for the fact that I make awesome food for myself to eat, and I would probably have to share that awesome food if I were playing the dating game. This would cause there to be less awesome food for myself, so I'll stay single and stare at good looking guys from my window using binoculars.
...
I'M  SERIOUSLY JOKING, SHEESH. (Besides, there's a giant tree outside my window and it blocks my view.)

Now that you probably think I'm a certified creep, it's time to do some damage control on my image and talk about one of the awesome foods I made...

GINGERBREAD COOKIES!


I know that you were expecting me to say "Gingerbread Men" but that is an astonishingly patriarchal and stereotypical assumption. Nah, nah, I kid. It really comes down to what kind of cookie cutters I have available. In this case, I had teddy bears, hearts, crescent moons, Christmas trees, and stars. BUT! Regardless of their shapes, they are seriously delicious and slightly crispy. I got  the recipe from Mrs. Fields (I love that woman) and bought icing in squeeze-y tubes to decorate them. They really don't need frosting, these cookies stand well on their own.

Gingerbread Cookies/Men
(Makes 3-4 dozen cookies, Recipe from Mrs. Fields Cookie Book)

3 1/4 cups all-purpose flour
1/2 tsp baking soda
1/4 tsp salt
1 tsp ground cinnamon
2 tsp ground ginger
1/4 tsp ground cloves
1 cup salted butter, softened
3/4 cup dark brown sugar, firmly packed
1 large egg
1/2 cup unsulfured molasses

1. Preheat oven to 325°F.
2. Mix together flour, soda, salt, cinnamon, ginger and cloves in a medium bowl.
3. In large bowl with an electric mixer cream butter and sugar. Scrape down the sides of the bowl. Add egg and molasses, and beat on medium speed until smooth. Scrape bowl and add the flour mixture. Blend on low speed until combined; do not overmix.
4. Separate dough into 2 balls and flatten into disks. Wrap each disk lightly in plastic wrap or a plastic bag, and refrigerate 1 hour or until firm.
5. On floured surface with a floured rolling pin, roll dough out to 1/4 inch thickness. With floured cookie cutters cut into gingerbread men. Gather scraps and reroll dough until all dough is used. Place on ungreased baking sheets 1/2 inch apart.
6. Bake for 8-10 minutes. When cookies cool, you can eat them. Or decorate them. Or do both. Have some fun!

I hope you have a very Merry Christmas, and that you spend it with your loved ones. Presents are great, but I really just love the family-time that Christmas symbolizes to me. Even if you don't celebrate Christmas, at least you should enjoy all the seasonal drinks that Starbucks has right now! Mmm, eggnog latte. Here is an unnecessary photo of me enjoying that very beverage.


 I hope you try making the gingerbread cookies! I will write more blog posts soon. I have a few new recipes I want to share :)


Sunday, November 17, 2013

Pumpkin Chocolate Chip Muffins

Hello y'all! *Ahem*
So... you may or may not have noticed that I have NOT blogged anything for a quite a long time. I have a really, really good excuse, I promise. Uh...
*crickets chirping*
I mean, being kidnapped by aliens makes it REALLY hard to write blog posts and make recipes.... you don't believe that I was kidnapped by aliens? Well fine then. You were right, I wasn't kidnapped by aliens.

However, in my defense I would like to say that balancing 3 jobs and taking 18 units of classes is hard and takes time away from things I want to do, like write super cute blog posts and share tasty recipes.

Right now I am nearly at the end of Fall Quarter, and I cannot believe how much stuff I still need to do. May I just say that grading essays is a BUMMER? I'm an IA (Instructional Assistant) for an Introduction to Psychology course, and I have over twenty lovely, lovely students. I believe they are bright young individuals who will move on to do great things. I'm sure that none of them intended to write essays that would make me lose hope in humanity, but alas, a few of them did. (Dear students, there is something called a "textbook." It worries me that it is so late in the quarter, and so many of  have failed to incorporate this wondrous object into your lives.) SIGH.

I made super-duper delicious pumpkin chocolate chip muffins a while ago, and forgot to post it. I also didn't take any photos (Boo! Alina how could you?!) So I have instead included a picture of pumpkin chocolate chip muffins from All Recipes, which look nearly identical to the muffins I made. Let's be real, muffins are muffins.


I brought these goodies to my Section of students during the first week of October and they gobbled 'em up. I strongly believe that these muffins are the reason that my students like me so much. A couple of weeks ago I asked them to give anonymous feedback regarding my teaching style, and nearly all of them mentioned my "fun and energetic personality." While I do think I am fun and energetic, I have no illusions about the power that food has over hungry eighteen year olds. 

I mean, do you think that THIS FACE would inspire so much affection without the help of pumpkin chocolate chip muffins? Oh please, as if. (Beeeteedubs, isn't my giant plush reproduction of a neuron - aka a brain cell - adorable? Look at it. I spent a lot of precious class-time explaining how neurons worked to my students...)


If you need to win the love of anyone -- your friends, your boss, or even your Psychology students... I promise that these muffins will do the trick :) Enjooooy!


Pumpkin Chocolate Chip Muffins
 (Makes approximately a dozen - Recipe adapted from All-Recipes)

 1/4 Cup white sugar
 1/2 Cup brown sugar
1/4 Cup vegetable oil
2 eggs
3/4 Cup canned pumpkin (PLAIN pumpkin, not pumpkin pie filling!)
1/4 Cup water
3/4 Cup all-purpose flour
3/4 Cup whole wheat flour
3/4 tsp baking soda
3/4 tsp all-spice/pumpkin-pie spice (may add more or less to suit your personal preference)
3/4 Cup mini-chocolate chips (I like mini-chocolate chips because they do not sink to the bottom of the muffins and ensure that every single bite is chocolate-y. If you want to use regular chocolate chips, just make sure that you get them slightly wet and coat them with flour to prevent sinking.)

1. Preheat the oven to 400 degrees F (200 degrees C). Prepare your muffin pan and line it with your paper liners. (Or you can grease and flour your pan, whatever floats your boat.)
2. In a medium-sized bowl, mix together your sugar, oil, and eggs. Add the pumpkin and water to this liquidy pulp. 
3. In a separate (large) bowl, mix together the flour, baking soda, baking powder, and pumpkin-pie spice. 
4. Add the wet mixture to the dry mixture in the large bowl. Mix it up like you mean business. Add in your chocolate chips and try not to drool.
6. Fill muffin cups 2/3 full with batter. Bake in your preheated oven for 20 to 25 minutes.

I hope y'all try this recipe out! It's so easy and yummy. One of my friends said that these were literally the best things I've ever made. That's a pretty strong compliment considering I make some pretty bomb desserts. Anyway, I promise I'll try to post more. I know I've been really bad about that lately...

Sunday, August 25, 2013

Easy Caramel French Toast - I'm BAAAACK!

Hola chicos! Que tal? Para mi, todo bien. :)

Well, here I am, 2 months later... I wanted to update my blog, but Cusco is not a city known for its fast internet. Or television. Or clean water. Or hot showers. But I digress. Here in the U.S. of A, we forget that our standard of living is NOT the norm around the world; instead, we're incredibly privileged.

In the program that I did in Cusco, I spent my first four weeks in a host family, and took Spanish classes at Amauta Language School. For my second four weeks, I lived in the student residences of Amauta and volunteered at la Clinica de San Juan de Dios with disabled children. This was my first time truly away from home and my parents, and also my first time using a language other than English. I actually did succeed in learning Spanish - while not quite fluent, I'm conversational and can definitely get by in a Spanish-speaking country. I also made some really close friends, and I'm grateful for having this opportunity to meet them. I did some amazing trips (Machu Picchu WHADDUPPP?!) and even went rock climbing and river rafting for the very first time!

All in all, this trip was a complete success! The recipe I'm gonna share with you is something that I made in Peru. Considering I didn't have access to some ingredients, AND I used a super scary gas burning stove (seriously, that thing nearly killed me. I'm the idiot who doesn't even know how to use matches. Also, I don't smoke, don't even get me started on lighters.), I think it turned out super duper well! I actually made this French Toast for a Spanish class assignment! Our teacher wanted us to make a recipe from our own country in class, while describing the recipe in Spanish. He claimed that this is so we could practice using the Imperative Form, but I think he just wanted an excuse to eat food in class.

America is such a mixed bag of cultures, so it was really hard for me to think of an iconic recipe that I could do with minimal equipment. I finally decided on French Toast, though I felt a little leery about it; I mean, FRENCH Toast hints at something decidedly un-American. However, I was reassured when the one French student in my class told me she had never heard of "Tostada Frances con huevos, azucar, y canela." Also, one of my Belgian friends told me that they call this dish "Lost Bread" in Belgium!


Easy French Toast
(Serves 6 - Recipe adapted from All Recipes)

4 eggs
3/4 C milk
3 tbsp sugar
12 slices white bread
Manjar/Dulce de Leche for drizzling over the toast*

1. Beat the eggs in a large mixing bowl, then add the milk and sugar. Continue to beat until fully combined.
2. Soak bread slices in the egg mixture, moving quickly so the bread is covered, but not soggy.
3. Heat a lightly buttered griddle or frying pan over medium heat. Brown the slices on both sides - this should take only a couple of minutes. Serve hot, with maple syrup or dulce de leche!

* In the States, we usually use maple syrup. In Peru, maple syrup seemed pretty expensive so I bought manjar, which is what Peruvians apparently call dulce de leche. Dulce de leche is a type of thick caramel made from condensed milk, which is popular in a lot of Latin American sweets. You can find it in cans in lots of supermarkets! If you prefer, you can definitely use maple syrup. However, I actually think the French Toast was better with manjar... mmm, caramel.


Hahaha I get a kick out of everything being in Spanish. I'm sure that when my Spanish improves, I'll get tired of being quasi-bilingual. And yesss, evaporated milk, it's cheaper than real milk! And the French toast still tasted AWESOME.


So give this recipe a go when you want a super simple, fast, and tasty breakfast! I promise, you won't be disappointed. Here's a last photo of me looking triumphant at Macchu Pichu. I'm sure that I would have looked even happier if I had eaten a breakfast of French Toast... instead of stale granola bars and Pringles (bleh) hahaha


Thursday, June 20, 2013

Peach Cobbler - a recipe from my biffle

Hello everybody!

If you know me in real life, you already know that I am going on a trip to PERU for 2 whole months!! This is simultaneously super exciting and kind of scary. Y'see, I've always been someone who doesn't like change. I make a decision and stick to it. I don't like uprooting myself, and I'm scared of ruining things by changing my mind. I was stuck in a rut, and four months back I finally decided to snap myself out of it.


 I applied for a Summer volunteer abroad program, since I've always been terrified of studying abroad. This way, I get to live in a foreign country, but don't have to worry about classes or studying. Then... I did something else that astonished myself: I cut my hair. I'd always been overly attached to it, and was convinced that all of my looks came from having long, straight, nearly waist-length hair. I donated 14 inches of hair to Locks of Love and haven't looked back!


Although some change is wonderful, there are some things I hope never change. This is gonna sound super duper cheesy, but I am truly blessed to have incredible friends. One of those friends is Tori, aka my biffle (who is a different individual from my home-skillet biscuit). Tori is planning on going to GERMANY for an entire year, and I found out that she'll most likely leave before I return from Peru. Because of this, we are trying to cram in as much bestie-time as possible. This involved us going shopping together, dyeing our hair together, having a sleepover, decorating matching BFF tank tops (with fabric paint and glitter), and making homemade peach cobbler!


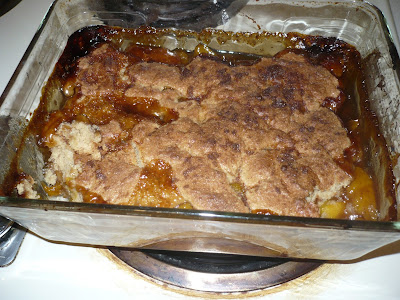
This is one of Tori's favorite desserts, and since she is a true Southern girl at heart, I think it's safe to believe her when she says this is the best peach cobbler recipe ever! It's got just the right amount of sweetness, a bit of crunch from the biscuit/cobbler topping, and tastes like love and home in a perfect spoonful! Top it with some vanilla ice cream and you are all set :)


Tori's Favorite Peach Cobbler
(Serves 6 - or alternatively, 4 people who really like cobbler! Recipe adapted from All Recipes)

Peach filling:
3 C peach slices (if canned, drain the excess liquid first. If using fresh, peel the peaches and cut into wedges)
1/4 C white sugar
1/4 C brown sugar
1/2 tsp cinnamon
1/4 tsp nutmeg
2 tsp corn starch

Cobbler*:
1 C all-purpose flour
1/4 C white sugar
1/4 C brown sugar
1 tsp baking powder
1/2 tsp salt
6 tbsp unsalted butter, cold and cut into cubes
1/4 C boiling water
* Tori says that she enjoys a higher cobbler to fruit ratio, so she likes to double all of these ingredients to make a very thick cobbler for the top of the fruit

Topping:
3 tbsp brown sugar
1 tsp cinnamon

1. Preheat oven to 425 degrees
2. Pour the peach slices in a 2 qt baking dish (we used a 9x13" baking dish), and add in the rest of the peach filling ingredients. Gently stir until all of the peaches are evenly coated with the mixture. It should look like this:


3. In a large bowl, combine flour, white sugar, brown sugar, baking powder, and salt. Blend in cold butter using either a pastry blender or your finger tips until the mixture resembles a coarse meal. Gradually pour in boiling water, and use a large spoon or small spatula to fold the water into the dough and combine it. Do not overmix. Pour the cobbler dough over the top of the peaches.
4. Combine the brown sugar and cinnamon for the topping, and sprinkle it evenly on top of the cobbler. The finished product before it goes into the oven will look like the picture below:


5. Place cobbler in oven and bake for about 30 minutes. If you choose to double the cobbler topping, it may take up to 45 minutes.
6. Let cool for about 15 minutes, and serve immediately! If you choose, add a scoop of vanilla ice cream.(The cobbler looks very brown because we used brown sugar, which caramelizes to a darker shade.)


Tori and I made this cobbler together (with her directing me haha), and it is absolutely delicious! Make this recipe for someone you love. I'll end this post with a super-cute picture of us.


Monday, June 10, 2013

Apple Cutie Pies

Something that never ceases to amaze me is... human behavior. This probably explains why I'm a Psych major. But honestly, humans are strange. We're all strange. Our behavior ranges from extreme jerkiness to extreme weirdness to extreme kindness. I feel that when you're living in the dorm, sharing a small space with everyone else, this becomes super-duper clear. Because you're around these people ALL THE TIME, you get to see sides of them that you would never otherwise be exposed to.

Jerkiness:
- People who puke in the communal dorm sink and just leave it there for 2 days. 
- People who clog the toilet, and don't unplug it even though there is a toilet plunger sitting 5 feet away. TRUE STORIES OF DORM LIFE, EVERYONE.

Weirdness:
- When people flip every single poster in the hallway upside-down. It's FINALS WEEK. Are you truly so bored of studying that you think this is fun? Or are you taking easy classes and have a lot of time on your hands? I don't understand...
- When people steal toilet paper from the custodial closet. Why?! There's toilet paper in the bathrooms. Why exactly do you need your own stash?

Kindness:
- When everyone in the dorm chips in to buy the custodian a present to thank her for all of her hard work.
- When people get together to do volunteer projects in the community
- When people say, "Thank you" to the staff members who work around the dorm community.
- LOTS more examples, but it would take too long to talk about each and every kind act :)

All in all, I've definitely met some real sweetie pies and cutie pies throughout my years at UCSC. And I'd like to honor those people with literal CUTIE PIES! These are miniature pies baked in muffin tins. My friends who tried them said they were some of the best apple pies they'd ever tasted. I know that you'll love them too! I adapted this recipe from Dani Cone's Cutie Pies Cookbook, which my homeskillet biscuit (aka best friend forevah) gave me for my birthday.


Apple Cutie Pies
Make Approximately 18 cutie pies

Pie Crust:
2 Cups whole-wheat flour*
3/4 Cup salted butter, room temperature
1/4+1/8 Cup white sugar
2 large eggs, lightly beaten

Place the butter in a medium bowl. Using a hand mixer, beat until it is softened. Add the sugar to the butter, and continue beating until it is light and fluffy. Gradually add the beaten eggs to the mixture, and beat it until it is just incorporated. Dump in all the flour at once, and beat it until it just starts to form a dough. Using your hand, pat the dough into one large round. Break the round in half, and wrap each half in plastic/saran wrap. Place the dough in the fridge for at least 15-30 minutes so it will be easier to work with.

*Note: I really like the nutty, earthy taste you get from using whole-wheat flour in the crust. If you're not a fan, feel free to use all-purpose instead.

Apple filling:
5 medium Granny Smith apples
1/4+1/8 Cup brown sugar
1 tsp cinnamon
1/4 tsp nutmeg
3/4 tbsp corn starch

Peel your apples and cut into half inch cubes. In a medium sized bowl, toss the apple filling ingredients together until the apple pieces are completely and evenly coated.

Crumb Topping:
1/4 Cup salted butter
1/3 Cup brown sugar
1/3 Cup flour
1/4 Cup oatmeal
1/4 tsp cinnamon

In a small/medium-sized bowl, mix all ingredients together except for butter. Cut the butter into small cubes or pieces, either with a knife or a pastry blender until the mixture resembles coarse bread crumbs

Constructing the Apple Cutie Pies:
1. Preheat your oven to 375 degrees.
2. Line a muffin tin with paper cups.
2. On a flat, well-floured surface, roll out your dough to 1/8 inch thickness. (It helps to work with one half at a time so that the dough will stay cold and won't be too difficult and sticky to work with.
3. Using a 2 1/2 inch cookie cutter, cut out rounds of dough. Using your fingers, carefully press the rounds into the paper muffin cups and crimp until the dough reaches about 3/4 of the way up the cups.
4. Fill each of the crusts all of the way full with the apple filling.
5. Spread the crumb topping over the apple filling of each cutie pie.
6. Put pies in the oven and bake for approximately 22-25 minutes, until the crust looks golden brown. Depending on your oven, you may need more or less time, so check periodically. Let pies cool completely, then enjoy!

The picture above shows how the pies will look before they go in the oven.


To all my cutie pies out there, give these a go! :) I hope you have a fantastic day!

Monday, May 27, 2013

Nutella Hot Chocolate Fudge Brownies

As I mentioned in my last post, finals are rushing up. You know what else is rushing up? MOVE-OUT DAY. Ugh. Have you ever tried packing all of your life up and moving into a tiny dorm room? It's pretty tough. You know what's even tougher? Packing all of your stuff back up so you can move OUT from the dorm room and back home. I feel as if I've somehow accumulated twice as much stuff as I originally brought, and I have no idea where it came from, AND I have to somehow bring all of it home in a single car trip. 

I've kind of started packing, and it's made me realize that a lot of the stuff I have in Santa Cruz is food. Or food related. I mean, I have cupcake pans and chocolate truffle molds here. And ingredients for baking. Since all of that is really bulky and would be difficult to take home (okay, taking 2 sticks of butter on an hour-long trip in a hot car just sounds stupid), I decided I should try to use up all my ingredients by baking a LOT of food for my friends at school to eat!

I had a nearly full jar of Nutella and a lot of hot chocolate mix, so I had a light-bulb moment and decided to make brownies! I was a little worried about the fact that I had no eggs, but the brownies turned out amazingly well! They are soft, incredibly fudgy, and the "edge-pieces" from the edge of the pan are very crunchy and chewy. (Side-note: I don't especially care for edge-piece brownies, but one of my best friends says they're the best part. I think he's insane, but it leaves more of the delicious gooey interior pieces for me.) I will definitely make these brownies again, and not just when I'm trying to use up my ingredients.


Nutella Hot Chocolate Fudge Brownies 
(makes 1 12x16 inch pan, or 2 9x13 inch pans)

1 C Butter
2/3 C vegetable oil
3 C sugar
3 C flour
2 tbsp baking soda
1 C cocoa powder
1 1/4 C dry hot chocolate mix (I used Nestle's rich milk chocolate)
1 C Nutella
3 tsp vanilla
1 1/4 C water
10 oz chocolate chips (about 1 1/2 Cups)

* May substitute water for 5 eggs - if doing so, reduce baking powder to 2 tsp.
* May substitute vegetable oil for an extra 1 C butter. You may also substitute butter for an extra 2/3 C vegetable oil.

1. Preheat the oven to 350 degrees. Grease or butter your sheet pan.
2. In a large bowl, sift together flour, baking powder, cocoa powder, and hot chocolate mix.
3. In a medium sized sauce pan over low heat, melt the butter completely. Add the sugar, and stir slowly to dissolve the sugar. Add oil, and continue stirring the mixture. Do not allow it to boil.
4. Add the sugar-butter-oil mixture to the large bowl, and mix until all the ingredients are combined.
5. Add Nutella and water to the mixture. Keep mixing (either with a whisk or a hand-mixer) until the batter reaches a smooth, thick consistency and all ingredients are completely combined.
6. Add in chocolate chips, and stir until evenly incorporated into the batter.
7. Pour the batter into the prepared pan(s), and spread it evenly. Batter should be quite thick.


8. Bake brownies for 30-35 minutes if in 9x13 inch pan, and for 40-45 minutes if in 12x16 inch pan.  The sides should be very set, while the center is moist. Test for "done-ness" with a toothpick or fork inserted into the center of pan; there should be moist crumbs clinging to the fork, but no batter.

I couldn't resist sneaking a bite out of the corner, straight from the oven!

9. Allow brownies to cool completely before cutting into pieces. You should get between 4 dozen and 6 dozen pieces, depending on how big you want your brownies to be.


Mmm, look at the gooey brownie. This was so simple to make, and can be easily halved as well if you don't want to make the ridiculous amount I did. Honestly, these brownies are disappearing super fast, so you probably won't have any issue with eating them all... though your tummy might not thank you haha. Seriously though, anyone who says, "Nothing tastes as good as skinny feels." has NEVER tasted my brownies. Try out this recipe next time you're in the mood for baking! :)


Saturday, May 25, 2013

Chocolate Cupcakes with Mascarpone Whipped Cream Frosting

Hellooooo!

Things have been getting all crazy up in here, with finals rushing up. It's insane for me to realize that I'm gonna be a junior in college in a few months! Aw geez, I'm gonna be an upperclassman, how cool! I remember being a junior in high school... I had stupid hair, wore too much makeup, and had the self esteem of a salted snail. I also had a penchant for writing emo Facebook statuses and updating my profile picture every two weeks with another selfie. Ohhh, those awkward cringe-worthy years. Actually, I'm still awkward and cringe-worthy, but I heard that the new word for that is "quirky," which sounds ten times more complimentary.

So I made these cupcakes a while ago for a sweetie-pie I know who turned 22 (just like Taylor Swift's song)! I wanted to make simple, delicious cupcakes that didn't require a handheld mixer or anything fancy. I used a simple one-bowl chocolate cake recipe from Sprinkle Bakes, and they turned out moist, chocolatey, and not too sweet. I envisioned a chocolate ganache topping the cupcakes, so I decided to buy some kind of chocolate nut butter -- I bought chocolate almond butter from Trader Joe's, but Nutella would be equally delicious! I made a stiff, pipe-able whipped cream frosting that wouldn't melt like regular whipped cream, but would still be just as tasty. 

Cupcakes are some of my favoritest things ever (big surprise, I know) because they're not only yummy, but they're adorable, tiny, and colorful as well. Everyone loved these cupcakes, and I'm sure you will too!


Chocolate Cupcakes
Yield: 19 cupcakes
3/4 Cup + 1/8 Cup unsweetened cocoa powder
1 1/2 Cups all purpose flour
1 1/2 Cups sugar
1 1/2 tsp baking soda
3/4 tsp baking powder
3/4 tsp salt
2 eggs
3/4 Cup hot water
3/4 Cup heavy cream
3 tbsp canola or other vegetable oil
2 tsp vanilla extract

Preheat oven to 350 degrees.

Line muffin tin with cupcake papers and set aside.

Sift together cocoa, flour, sugar, baking soda, baking powder and salt into a large bowl.  Add eggs, water, heavy cream, oil and vanilla.  Mix with whisk or hand mixer until smooth.  

Divide batter among muffin cups, filling each half full.  Bake for 20 minutes.  Let cool. 


Homemade Whipped Cream Frosting (For Piping)
8 ounces mascarpone cheese (or cream cheese)
1/4 Cup sugar
1 Cup heavy whipping cream
1 1/2 tsp vanilla extract

Scrape the mascarpone or cream cheese into a large bowl, and add the sugar and vanilla extract. Whip it until it reaches a smoother, less clumpy texture. Pour in the heavy whipping cream and continue whipping until the consistency becomes smooth, fluffy, and stiff. Do not overwhip, or it will begin to look clumpy. If your frosting is too soft to pipe, chill it in the refrigerator for an hour.

Constructing the Cupcakes:
After the cupcakes are cool, spread each of them with about a tablespoon of chocolate nut butter on top. Pipe or carefully spread the whipped cream frosting over the top of the cupcakes. If desired, garnish with rainbow sprinkles like I did!


These cupcakes are sure to bring a smile to anybody's face! I hope you try them out. They are fantastic for birthdays or really any day. If you bake them for your special someone, they'll be astonished by your crazy baking talent, and will immediately fall in love with you. Why wouldn't they? I'd fall in love with someone who brought me cupcakes as delicious as these ones. MmHMM. Have a fantastic Memorial Day Weekend!

Wednesday, May 15, 2013

Mini Fruit Tarts Baked in Muffin/Cupcake Tins

Hello everyone!
Today is Wednesday, which I learned is traditionally called "Hump Day." I find that amusing for some reason. If you are not amused, I understand. I've discovered that not everyone shares my amazing sense of humor. For example, funnily-shaped bananas make me laugh. You know those bananas that aren't curvy? But are super duper straight? YEAH THOSE THINGS ARE THE BEST... And probably the reason why people in the dining hall give me strange looks and avoid me. I mean, a girl giggling hysterically while staring at the fruit stand is probably not gonna make very many friends, y'know what I mean?

I think I've made you feel vaguely uncomfortable at this point. But fear not, dear readers! There was an actual reason for my reminiscing about fruit...

Today, I will teach you how to make the most delicious fruit tarts of your life!!

I got the recipe from Joy of Baking, but adapted the proportions and amounts so that I could bake the tarts in muffin tins. I LOVE the idea of miniature desserts (which explains why my name is Princess Cupcake...)! I know there seems to be a lot of steps, but all of them are very simple and the results are definitely worth it!


Mini Fruit Tarts
Makes approximately 18 tarts
Shortbread/Cookie Tart Crust:
2 Cups all-purpose flour
3/4 Cup salted butter, room temperature
1/4 + 1/8 Cup white sugar
2 large eggs, lightly beaten 

Place the butter in a medium bowl. Using a hand mixer, beat until it is softened. Add the sugar to the butter, and continue beating until it is light and fluffy. Gradually add the beaten eggs to the mixture, and beat it until it is just incorporated. Dump in all of the flour at once, and beat it until it just starts to form a dough. Using your hand, pat the dough into one large round. Break the round in half, and wrap each half in plastic/saran wrap. Place the dough in the fridge for at least 15 - 30 minutes so that it will be easier to work with.

Once you are ready to make crust, preheat the oven to 375 degrees. Line your muffin tins with paper muffin liners.Then, prepare a flat surface by lining it with wax paper and generously dusting it with flour. Make sure your hands and rolling pin are covered with flour as well, as the dough will be quite sticky. Remove one dough round from the refrigerator, reserving the other one in the fridge until you are ready to work with it. Roll out dough with your rolling pin until it is 1/8 inch thick.Using a 3 1/2 inch cookie cutter, cut the dough into rounds. Press each crust-round into the muffin tin liner (keeping the liner in the cup), and use your fingers to flatten and crimp the dough until the crust reaches up about 3/4 of the way up the liner. Using a fork, lightly prick the bottom of each crust to prevent it from puffing up in the oven.

Once you have finished making all of the crusts, place muffin tins in oven for approximately 12-15 minutes. They should be a light golden color when completely baked. Allow crusts to cool in the tins. Carefully remove the crusts when finished cooling. They should look like this:


Pastry Cream:
3/4 Cup milk (either whole or 2% or fine. I do NOT recommend using milk that has a lower fat content than this. Nondairy milk does not work well either.)
2 large egg yolks
1/8 Cup white sugar
1 1/2 tbsp all-purpose flour
1 1/2 tbsp corn starch
1 tsp vanilla
*Optional: 1 tsp liquor


In a medium heat-proof bowl, mix the sugar and egg yolks together. Sift the flour and cornstarch together and add to the egg mixture, mixing until the texture becomes a smooth paste.

Meanwhile, in a saucepan bring the milk and vanilla extract just to boiling (just until milk starts to foam up.) Remove from heat and add slowly to egg mixture, whisking constantly to prevent curdling. (If you get a few pieces of egg (curdling) in the mixture, pour through a strainer.) Then pour the egg mixture into a medium saucepan and cook over medium heat until boiling, whisking constantly. When it boils, whisk mixture constantly for another 30 - 60 seconds until it becomes thick. Remove from heat and immediately whisk in the vanilla and the liqueur (if using). Pour into a clean bowl and immediately cover the surface with plastic wrap to prevent a crust from forming. Cool to room temperature. If not using right away refrigerate until needed, up to 3 days. Beat or whisk before using to get rid of any lumps that may have formed.

When making the pastry cream, it is useful to refer to this video for visual cues:


Fruit Topping:
1 1/2 Cup fresh fruit (blueberries, strawberries, pineapple, kiwi, melon, cherries, raspberries, blackberries, plums, peaches, etc.)

Wash your fruit, and if necessary, slice into small pieces (1/2 inch cubes are fine) so that they will fit in your tarts.

Homemade whipped cream (Garnish): 
3/4 Cup heavy whipping cream
1 tsp vanilla
1/8 Cup sugar

Constructing the fruit tarts:
Put about two tablespoons of pastry cream in each tart shell. Top with fruit. Garnish each fruit tart with a dollop of whipped cream. Serve immediately!


I hope you try these out! These tarts are sure to bring a smile to your face, and they are a perfectly light, Spring/Summer dessert!

Tuesday, April 30, 2013

College Kid Chocolate Chip Cookies

Do you know that feeling when it's late at night, you have an important paper due the next day, your skin is breaking out from stress, and you REALLY WANT A COOKIE?

... haha... I mean, hypothetically, I'm sure YOU would know that feeling. I mean, I wouldn't. I'm a princess. I am always poised. And my skin is perfect. So perfect. Mmhmm.

But I mean, I'm sure that if you were to hypothetically really want a delicious homemade cookie, and you had kind of limited ingredients, you would ask ME for an awesome-tastic recipe, amirite?

See, living in the dorms and not having a car makes it hard for me to go grocery shopping. Which means that I often don't have things like eggs. Or milk. Or butter. Or brown sugar... Which are things that I always thought were important for a delicious, chewy, chocolate chip cookies.

IT TURNS OUT I WAS WRONG!


College Kid Chocolate Chip Cookies
(makes 20 cookies)
2 Cups flour
1 Cup sugar
1 1/4 tsp baking soda
1/2 tsp salt
1 Cup chocolate chips OR 8 oz chocolate, roughly chopped
1/2 Cup vegetable oil
1/4 Cup water
2 1/2 tsp vanilla
2 tbsp caramel sauce (ice cream topping such as Smuckers)
1 tbsp chocolate syrup (ice cream topping such as Smuckers)

*You can substitute the 2 tbsp caramel sauce and 1 tbsp chocolate syrup for 3 tbsp honey, or 2 tbsp molasses!*
*You can substitute 1 Cup white sugar for 1 Cup brown sugar, and exclude the caramel sauce and chocolate syrup completely.*

1. Preheat oven to 350 degrees.
2. Sift flour, sugar, baking soda, and salt together in a large bowl.
3. Add vegetable oil, water, vanilla, caramel sauce, and chocolate sauce to the mixture. Knead everything together using your hands until a sticky dough starts to form.
4.  Once dough is completely mixed (there should be no clumps or traces of dry ingredients remaining), add in the chocolate chips. Knead them in using your hands until the chips are evenly distributed in the dough.
5. Drop balls of dough (about 2 tablespoons each) onto a baking sheet, evenly spaced 2 inches apart.
6. Place baking sheet in oven and bake cookies for approximately 10 minutes.

When removing cookies from the oven, they should still look moist and gooey on top, but will be browned around the edges. Don't worry about them being under-baked (since they don't have eggs, there are no health risks!) They will continue to firm up and "cook" on the baking sheet as it cools.

So... these cookies are technically vegan! I'm kind of a dessert snob, and I feel that a lot of times in vegan baking, you can taste that "something" is missing. This is truly not the case with this recipe; they taste just as good as any version with eggs and butter. The water keeps the cookies moist, and the syrup gives the cookies a chewier texture, along with adding richness and that "brown sugar taste". None of my taste-testers were able to tell that these were vegan, and everyone went for seconds!


Look at this yumminess. LOOK AT IT. Do you want them? I bet you do. Go make them yourself, I promise that you'll love the cookies AND you'll impress everyone with your mad baking skillz.

Now, excuse me while I go stuff my face with more cookies. (Daintily of course... I AM Princess Cupcake after all!)

Monday, April 29, 2013

Magic 2 Ingredient Chocolate Mousse

Chocolate mousse is one of those desserts that is utterly delicious, but seems super duper classy at the same time. I feel like when you order chocolate cake at a restaurant, people judge you and think, "Gosh, don't you know how many calories are in that?!" But when you order chocolate mousse, people think, "Wow. My friend is obviously some kind of gourmet bourgeoise foodie-type." Or maybe this is all in my head and I'm a little bit cray-cray. WHATEVS.

Unfortunately, the one time that I ever tried making traditional chocolate mousse, I over-whipped the cream, failed to entirely melt chocolate mixture, and did something weird with the eggs. The end-result had a thoroughly unappetizing texture, complete with chunky bits of half-melted chocolate. My family ended up dumping the entire batch because no one would eat my chocolate mousse. It scarred me for LIFE. FOR LIIIIFE. I thought I was doomed to an existence without fanciness, since chocolate mousse was clearly out of my league.

LUCKILY, it turns out I was wrong!

Did you know that you can make chocolate mousse with just TWO ingredients?
Chocolate + water = mousse
Say WHAAAAT? I know you don't believe me right now, but check this gorgeousness out:


If you want to be super-fancy (and obviously you want to be super-fancy), you add in more things to enhance the flavor. AND you top your chocolate mousse with homemade whipped cream. If you've only experienced the stuff from a can, you are missing out.

Seriously though, this chocolate mousse recipe is magical. I didn't believe that you could whip together chocolate and water and somehow produce something this rich, smooth, and velvety, but it truly somehow works! Word of caution: if you're not someone who loves intense dark chocolate flavors, this recipe might not be for you. If you're a hard-core chocoholic, not only are we now officially BFFs, but you're gonna love this.


I first learned about this technique a couple years ago from Diamonds for Dessert - all of her recipes look so gorgeous and delicious! I also found Heston Blumenthal's video very informative and useful for visual cues:


Since you're only using a couple ingredients, it's extremely important that you use a high quality chocolate. I suggest using at least 70% dark chocolate; I like Ghiradelli's, Scharffenberger, and Lindt. I also like the Trader Joe's brand giant 2 pound chocolate bars. Additionally, it is very critical that you have the exact proportion of chocolate : liquid! That means if you want to put in 2 tablespoons of liquor, you have to take out 2 tablespoons of water.

Magic 2 Ingredient Chocolate Mousse:
(Makes approximately 6 servings)
9.35 oz dark chocolate (a little bit more than 1 1/8 Cups of dark chocolate chips)
1 Cup water
Optional: sugar (to taste)

Ice
One large bowl, and one smaller bowl that can easily fit inside.


Fill the large bowl about 1/4 of the way with ice, and check that the smaller bowl will fit snugly inside, with the ice surrounding it. Place both bowls in the freezer so they will be completely chilled.

In a medium saucepan, melt the chocolate and water together on medium heat. Whisk it occasionally so it will melt smoothly.  Once the chocolate mixture is completely melted, remove the bowls from the freezer. Pour the chocolate into the smaller bowl (without removing it from its ice bath) and begin whipping it with whisk. As you whisk, the mixture will begin to thicken and form the texture of lightly whipped cream (this step may take a while.) Continue whipping until you are able to scoop up some of the mixture with a whisk. Do not overwhip, or the mousse will have a grainy texture. If this happens, simply remelt your mixture over the stove and restart the whipping process.

When the mousse reaches the perfect consistency, pour it into individual serving containers. Top with a dollop of homemade whipped cream, and place it in the refrigerator. Your mousse will continue to firm up as it chills.

Suggested Add-ins/Flavorings for Chocolate Mousse:
Remember: if you add in any additional liquid, you must take out an equal amount of water!

- 1 shot of liquor (Ex: Baileys or Kahlua)
- 2 tsp of vanilla
- Use brewed tea instead of water (I think Jasmine-Green tea would be divine)
- 2 tsp lemon/orange zest
- 1 tsp cinnamon
- ... whatever your heart desires!

Homemade Whipped Cream (for garnish):
1/2 Cup heavy whipping cream
3 tbsp sugar
1 tsp vanilla

Put the cream, sugar, and vanilla into a medium bowl. Use a whisk to whip it until it thickens and reaches the texture of whipped cream.

You really need to try this out, it's scrumptious and ridiculously easy. If you're wondering, YES, you can definitely speed up the whipping process of the chocolate mousse (and the whipped cream) by using a hand-held mixer. You just need to be extra cautious to make sure that you don't over-whip the mousse by mistake. Then again, if that happens, you can always remelt it and restart the process.

Enjoy! :)

Sunday, April 28, 2013

Blueberry Scones + Clotted Cream

Hello world! *waves awkwardly*

WELL. I've been talking about "maybe" making a blog "someday" for months... And I finally did, so this is kiiiinda nerve-racking. Or at least it is for me. I mean, keep in mind that I was an easily frightened child who broke into hysterics the first time I met Mickey Mouse in Disneyland, mmkay?


... I was two, and let's be real, he's totes scary. C'MON. A six-foot mouse? I get the heebie-jeebies just thinking about him.


ANYWAY, let's move on to something that's less frightening and loads more delicious. Also, I feel like you're probably laughing at me and I really need to redeem myself.  I present to you my recipe for...


Blueberry Scones!
Recipe adapted from: All-Recipes


3 Cups all-purpose flour
1/3 Cup sugar
3/4 tsp baking soda
6 tbsp of salted butter, frozen and cut into cubes (I know this sounds weird, but trust me. It works better to cube your butter first, then place it in the freezer to firm up)
1/2 Cup blueberries (either fresh or frozen)
1/2 Cup Greek yogurt (I used blueberry flavored)
1 large egg

1. Preheat oven to 400 degrees
2. In a medium bowl, mix the flour, sugar, and baking soda together. Once it's all combined, dump in your cubes of ice-cold butter. Using your hands, incorporate your butter in until the dough looks like coarse meal. Add in your blueberries, and be careful not to squish them.
3. Add the Greek yogurt and the egg to your dough. Use a fork (and your hands) to gently but firmly mix everything together. The mixture might look too dry at first, but trust in Princess Cupcake. Keep mixing - your dough will be VERY sticky and clumpy.
4. Lightly dust a baking sheet with flour. Put your dough on the baking sheet and press it until it forms an 8 inch round. Using a knife, carefully cut the round into 8 wedges.
5. Move the wedges apart until they are not touching and are evenly spaced. If you desire, sprinkle about 2 tablespoons of sugar on top of the scones.
6. Place your scones in the oven and bake for about 15 minutes. The bottoms should be brown, but not burned. I'd say "bake until golden-brown," but the blueberry yogurt changes the color of the scones...

I like scones because they look fancy, sound fancy, and taste fancy, but in reality they're a cinch to make. PLUS my recipe is easily adaptable so you can make any kind of scone your heart desires. Want strawberry scones? Use strawberry yogurt and pieces of strawberries! Want chocolate chip scones? Use plain Greek yogurt and chocolate chips! The list is basically endless.

I always associate scones with England (not only because scones are British, DUH), but because I visited Europe with my family when I was about twelve. We ended up going to a place in the English countryside for afternoon tea... I can still remember the scones and the freshness of the clotted cream, which had been made just that morning! Our tour guide joked that we would know that we'd put the proper amount of clotted cream on our scones once it touched the tip of our noses. I don't think he really expected me to take that to heart, but believe me, I did. It was magnificent.


HOWEVER, clotted cream is super hard to find in most stores! Here's an easy-peasy recipe to make an acceptable substitute. My favorite version is the one with mascarpone cheese... you can find it in Trader Joe's! 


Homemade Substitute for Clotted Cream:
3/4 Cup heavy whipping cream
1/2 Cup (4 oz) of either sour cream, cream cheese, OR mascarpone cheese (if you're lucky and you can find it in stores!)
1/8 Cup sugar
1 tsp vanilla extract

Dump all of these ingredients into a medium bowl, and whip it (either with a whisk or with a hand-held mixer) until the mixture is completely combined, smooth, and fluffy. Add more or less sugar to taste.


Deeelicious. And there you have it!
These scones make a great breakfast, lunch, snack, or anything in-between. Your friends and family will definitely be impressed and start treating you like the princess you are.

OR you can just eat them all yourself, and have daydreams about being royalty and having tea with the Queen. I have included some imaginary dialogue for you if you choose to take this route: "We ARE amused! Pip, pip, cheerio, these scones are QUITE charming!"